

Is There An App For Connecting Wifi To My Samsung Phone
Connecting to a Wi-Fi Network on my Samsung Device
Last Update date : Oct 15. 2021
There are many different ways of accessing your Wi-Fi settings and connecting to a Wi-Fi network. You can either connect via your Quick Settings panel, Connections settings or by using the QR Scanner. Click on the below drop-down menus to learn all the different ways of connecting to a Wi-Fi network.
Please Note: This guide is designed for Australian variant Galaxy devices, if you have an international device and require further support click here to get in touch with your Samsung Subsidiary.
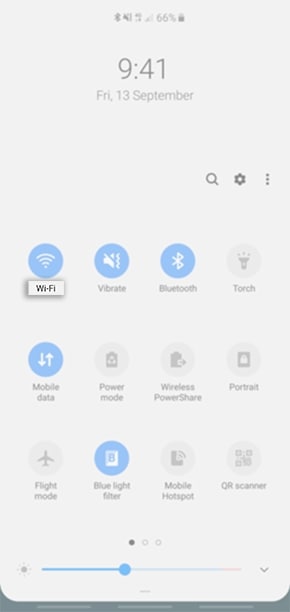
Using the Quick Settings Click to Expand
1 Swipe down to access your Quick Settings and tap on  to turn on your Wi-Fi settings.

2 Tap on the word Wi-Fi to view available Wi-Fi networks
3 Select your Wi-Fi network

4 Enter the Password then tap Connect

Using Connection Settings Click to Expand
1 Head into your Settings > Connections

2 Toggle on the switch to turn on Wi-Fi then tap again to view more settings

3 Select the Wi-Fi network you would like to connect to

4 Enter the Password then tap Connect

5 If your Galaxy device is operating on Android OS Version 9.0 (Pie), you will be able to see a QR Code generated at the top of the page, this can be used to connect other devices without having to re-enter the password.You can also tap Forget to remove as a connected Wi-Fi network.

Using the QR Scanner Click to Expand
Note: This setting is only available on Galaxy devices operating on Android OS Version 9.0 (Pie) and above. Not too sure what software version your Samsung device is operating on? Check out our guide Find out what version of Android OS my device is running for step-by-step instructions.
1 Swipe down to access your Quick Settings and tap on  to turn on your QR Scanner

2 Tap OK

3 Point your camera at the QR Code then tap on the pop up message to connect

4 Tap on Connect

Thank you for your feedback!
Contact Info
Online
There are a number of a different ways of contacting us via Live Chat, Email and more Chat Support : 24/7
Call
8am-8pm / 7days a week
For general enquires and technical support
View more
Face to face Support
Whether your product is in warranty or out of warranty, we're here to help.
View more
Samsung Online Store 

Shop online for the latest Samsung smartphones, tablets, wearables and accessories.
Join Members Community 

Run device diagnostics, chat with Samsung Customer care or other Samsung fans, access to FAQs as well as tips & tricks without sending your device away
Warranty Information 

Read the Terms & Conditions of your Samsung Warranty and Australian Consumer Law.
View more
- Home Home
- Product Help & Support Product Help & Support
- Mobile Device Mobile Device
Is There An App For Connecting Wifi To My Samsung Phone
Source: https://www.samsung.com/au/support/mobile-devices/connecting-to-wifi-network/
Posted by: tharpsandint.blogspot.com
0 Response to "Is There An App For Connecting Wifi To My Samsung Phone"
Post a Comment